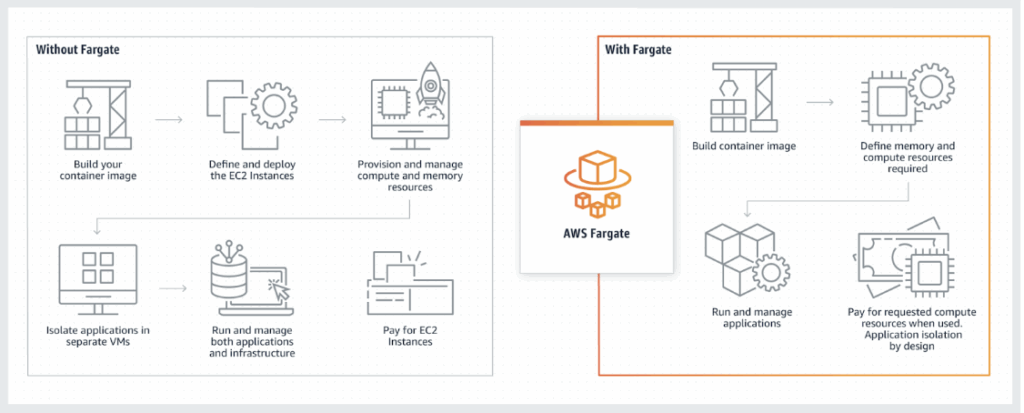
Running Docker containers directly on Amazon EC2 is often the first step developers take when exploring AWS. It’s straightforward, gives you full control, and feels familiar. But as your applications scale, managing containers on EC2 quickly becomes a burden — you’re responsible for scaling, networking, patching, and high availability. This is exactly where Amazon ECS with AWS Fargate transforms the game: instead of managing servers, you offload infrastructure to AWS and focus entirely on building and running containers.
In this guide, I’ll walk you through a hands-on migration journey: moving a Dockerized app from an Ubuntu EC2 instance to ECS with Fargate. This version is based on my own project experience, highlighting both the smooth paths and the bumps I encountered. It’s designed as a practical, self-contained tutorial you can follow step by step.
Why Migrate?
When I first ran Docker on EC2, it was fine for small experiments. But issues quickly appeared:
- Manual scaling when traffic increased.
- The networking setup (security groups, subnets) became messy.
- Logs and monitoring required custom hacks.
With ECS Fargate:
- No servers to manage (AWS handles it).
- Easy to scale — just set desired tasks.
- Deeper integration with AWS services (CloudWatch, IAM, ALB).
So I decided to migrate — here’s how it went.
Prerequisites
Before starting, make sure you have:
- An AWS account with administrative access.
- AWS CLI installed and configured locally (or be ready to configure it on the EC2 instance).
- Basic familiarity with Docker commands.
Step 1: Running Docker on EC2 (Ubuntu)
Launching the EC2 Instance
Launch an Ubuntu EC2 instance (t2.micro works for testing, free-tier eligible). While launching:
- Select Ubuntu Server 22.04 LTS as the AMI.
- Choose t2.micro (or larger for heavier workloads).
- Configure security group to allow SSH (port 22) and HTTP (port 80).
- Create or use an existing key pair for SSH access.
# Update system & install Docker + AWS CLI
sudo apt update -y && sudo apt upgrade -y
sudo apt install -y docker.io awscli

# Verify installations
docker --version
aws --version
Configure AWS CLI:
aws configure
Fill in:
- AWS Access Key ID
- AWS Secret Access Key
- Region (e.g., us-east-1)
- Output format → press Enter (defaults to JSON)
✅ At this point, EC2 can talk to AWS services.
Step 2: Build and Push Docker Image to ECR
Create ECR Repository
aws ecr create-repository --repository-name nginx-image
Authenticate Docker with ECR
aws ecr get-login-password --region us-east-1 | \
docker login --username AWS --password-stdin <AWS_ACCOUNT_ID>.dkr.ecr.us-east-1.amazonaws.com
Build, Tag, and Push Image
docker build -t nginx-image .
docker tag nginx-image:latest <AWS_ACCOUNT_ID>.dkr.ecr.us-east-1.amazonaws.com/nginx-image:latest
docker push <AWS_ACCOUNT_ID>.dkr.ecr.us-east-1.amazonaws.com/nginx-image:latest
Check in the AWS Console → ECR → Repositories → verify your image exists.
Step 3: Create ECS Cluster
- Go to ECS Console → Clusters → Create Cluster.
- Choose Networking only (Fargate).
- Name it migration-cluster.
Pro tip: ECS automatically integrates with your VPC. Stick with the default VPC for testing.
Step 4: Define a Task Definition
- In ECS → Task Definitions → Create.
- Launch type: Fargate.
- Name: nginx-task.
- IAM role: ecsTaskExecutionRole (create if missing).
- Resources: 0.25 vCPU, 0.5 GB RAM.
- Add container:
- Name: nginx
- Image: <AWS_ACCOUNT_ID>.dkr.ecr.us-east-1.amazonaws.com/nginx-image:latest
- Port: 80 → 80
⚠️ Gotcha, I hit: If your IAM role isn’t set correctly, ECS won’t pull images. Ensure ecsTaskExecutionRole has permissions for ECR.
Step 5: Run as a Service
- In Cluster → Services → Create.
- Launch type: Fargate.
- Task definition: nginx-task:1.
- Service name: nginx-service.
- Desired tasks: 1.
- Networking:
- Choose default VPC + public subnet.
- Enable Auto-assign public IP.
- Security group: allow inbound HTTP (80).
✅ After creation, ECS deploys your container on Fargate.
Step 6: Verify Deployment
In ECS → Cluster → Tasks:
- Wait for status RUNNING.
- Click task → find Public IP under ENI.
Visit:
http://<PUBLIC_IP>
🎉 You should see the Nginx welcome page.
If not:
- Check security group inbound rules.
- Confirm you used a public subnet.
- Use View Logs in ECS for container errors.
Step 7: Cleanup
To avoid charges:
- Delete the ECS service & cluster.
- Delete the ECR repo.
- Terminate the EC2 instance you used to build the image.
Lessons Learned (My Notes)
- IAM roles are critical — without proper permissions, tasks fail silently.
- Networking is tricky — always ensure you’re in a public subnet with a public IP for testing.
- Console vs CLI — console gives visibility, CLI is faster once you’re comfortable.
- Scaling on ECS is just changing task count; on EC2, it was a headache.
Conclusion
Migrating from Docker on EC2 to ECS Fargate transformed how I manage containers on AWS. No more manual server patching or scaling pain — ECS handles it. This guide shows the practical path, including common pitfalls, so you can replicate (and improve on) my journey.
👉 Whether you’re running experiments or preparing for production, this migration will simplify your container workloads dramatically.

