Amazon S3 is one of the most interesting services in AWS. It is a service that has unlimited storage for files. It is one of the services requiring little to no monitoring and maintenance whatsoever. Every other storage service, such as EBS, Storage Gateway, or EFS, requires some sort of monitoring, maintenance, or improvement over time. Whether it is increasing the disk size to meet capacity demands or optimizing I/O speed to improve performance. S3 by default handles this to a very good extent.
Due to these unique qualities of Amazon S3 mentioned above, users of S3 hardly have to worry about maintenance or scalability. But as much as they do not worry about that, there is still one more thing to plan in Amazon S3, and that is Security.
AWS has gone to great lengths to ensure S3 is secure by default. The latest initiative from them is to automatically enable S3 Block Public Access and disable S3 access control lists (ACLs) for all new S3 buckets. This was done in a bid to help improve security by default for all objects in S3 so that users can feel more comfortable storing objects in S3.
We shall talk about the common mistakes users make in trying to deliver business value, but at the same time make objects and files insecurely accessible on Amazon S3.
The Mistakes

Even with the “security by default” policies that Amazon S3 has enforced on S3 buckets, users still want to make objects publicly available for different purposes. Some of these are the following:
- Images, CSS, and JavaScript files stored in S3 can be used as assets for a website
- Other types of files that need to be shared with a third party
They end up making the S3 bucket public, and all the components of the bucket public. As much as this solves the business problem of making objects public, it is a violation of the AWS Security best practices as stated here and here.
It is also tempting to use this approach because it is easy to do in the Amazon S3 Console. It creates a security threat to objects in the S3 bucket, so it is highly discouraged to do that. If you need to make your objects accessible publicly on S3, there are better and more efficient ways to get that done.
What are the Secure Options?
There are several ways to share objects in S3 in a more secure format they are:
- Create a signed S3 URL that is valid for a period of time
- Create a signed CloudFront URL that is valid for a period of time
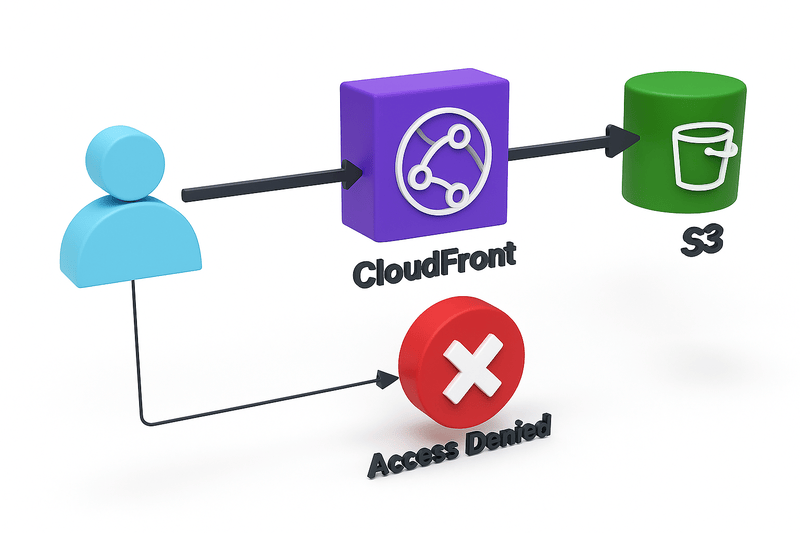
- Use Origin Access Control (OAC) in CloudFront to restrict direct access to S3
In this article, we shall focus on the first and the third implementations. Without further ado, let us explore the steps needed to generate a pre-signed URL on S3.
Getting our hands Dirty
First, we will start with generating a Pre-signed URL in S3, then we will talk about how to use CloudFront OAC for S3 Objects.
Generating Pre-signed URLs in S3
As stated previously, we want to make sure the object is securely accessed. The first step is to upload an object to an S3 bucket.
When the object has been uploaded, the next step is to generate the URL. To do this, use the following steps:
- Select the object/file you want to share securely.
- Click on the Actions drop-down menu item.
- Click on the Share with a pre-signed URL menu item.

- On the pop-up menu, configure how long you want the URL to be valid.

- When you are done with the configuration, click Create pre-signed URL.
- The pre-signed URL will be generated and copied to the clipboard. You can also see it at the top menu bar, where you can click Copy pre-signed URL
The pre-signed URL is the link you can share with a third party that needs to access the file. After the time you configure it, the link will no longer be valid.
Use Case: To use a case for this is when you want to share a download link that will expire. You want the user to have short-lived access to the file.
Let us look at the third implementation, which is broader and more bucket-wide than object-wide and adds CloudFront, which improves the load time of the object.
Using CloudFront OAC for S3 Objects
The major advantage of this option is that it covers all objects in a bucket, but it is best suited when you do not need to secure timely access to the object. These are the steps:
- Navigate to the AWS CloudFront Management Console.
- Click on the Create Distribution button.

- Select the Origin Domain, which in this case is the name of the bucket you want to make the items public.
- After selecting the Origin Domain, the Name will be automatically generated.
- On Origin Access, click Origin Access control settings (recommended).
- Create an Origin access control by clicking on the Create control setting.
- The pop-up already populates a Name, which is the Origin name we selected previously.

- Leave all other inputs and entries as it is and click on the Create button in the screenshot above to create the Origin access control (OAC).
- On the Web Application Firewall (WAF) section of the Cloudfront configuration, click Do not enable security protections. We do not need WAF at the moment, because we are setting a bare minimum. However, it is advisable to have a WAF configured for improved security.
- Set the Default root object to be / as shown in the following screenshot

- Click on the Create distribution button. This will create the distribution.
It takes a couple of minutes to create, but when it is done, it will generate a URL, as shown in the following screenshot.

To access any object in the S3 bucket, use the URL from CloudFront and the object name in S3. Say we have a file in S3 called `logos.png`. To access this object via Cloudfront, the URL is: d3p5ntf06t2poh.cloudfront.net/logos.png
So apart from Cloudfront acting as a shield and protector to avoid your S3 buckets from being public, it also brings some advantages. The next section explains other advantages of Amazon CloudFront.
What are the advantages of CloudFront?
- Improve the load time of images by separating them from the main application load time
- Bring content closer to users using the AWS Global PoP network on CloudFront
If you are not an article person, this is the video that explains the steps of the setup in this article.
In this article, I explained different modes of sharing data in Amazon S3 in a secure form without making a bucket public. The first method is to use CloudFront, and the second is to use S3 Signed URLs. These two methods ensure your bucket is not public, compliance with S3 Security best practices, compliance with GDPR, and the safety of your data.

